- ●初期設定
- http://ftp.jaist.ac.jp/pub/raspberrypi/raspbian/images より、ソフトをダウンロードする。2015-05-05-raspbian-wheezy で動作確認しています。
- ※jessie では、mencoder がなくなったようです。以下のままではうごきません。
- ソフトを、microSD にコピーする。DD for Windowsなどが便利です。
- イーサネットもしくは、シリアルで接続。ssh でログインできる。ユーザ名は pi、パスワードは raspberry。
- sudo raspi-config で、パーティションを拡大する。ついでに、カメラも有効にする。I2C も有効にする。TimeZone を Tokyo に。
- ソフト一式を /home/pi/ にダウンロードwget http://gakkan.net/jiro/whoami/pi/soft.tgzして展開tar xzf soft.tgz、sudo ./setup.sh してください。
Raspberry Pi3(秋月電子)、2016-03-18-raspbian-jessie-lite で動くように変更しました。- ソフト一式を /home/pi/ にダウンロードwget http://gakkan.net/jiro/whoami/pi/soft2.tgzして展開tar xzf soft2.tgz、sudo ./setup.sh してください。
setup.sh#!/bin/sh
# raspberry pi2/3 for WebCam setup by jiro@gakkan.net
# http://gakkan.net/jiro/whoami/pi/
# checked on pi3 with 2016-03-18-raspbian-jessie-lite
# update
apt-get update
apt-get upgrade -y
# softwares
apt-get install python-smbus python-qrtools open-jtalk open-jtalk-mecab-naist-jdic htsengine libhtsengine-dev hts-voice-nitech-jp-atr503-m001 imagemagick fswebcam libav-tools apache2 -y
wget https://raw.githubusercontent.com/IDCFChannel/bme280-meshblu-py/master/bme280_sample.py
# Voice data
wget https://sourceforge.net/projects/mmdagent/files/MMDAgent_Example/MMDAgent_Example-1.6/MMDAgent_Example-1.6.zip
unzip MMDAgent_Example-1.6.zip
mv MMDAgent_Example-1.6/Voice/* /usr/share/hts-voice/
rm -Rf MMDAgent_Example-1.6*
# for Web
cp scale.png /var/www/html
rm /var/www/html/index.html
cp log /usr/lib/cgi-bin
cp /etc/apache2/mods-available/cgi.load /etc/apache2/mods-enabled/
# system files
cp crontab /etc
cp rc.local /etc
cp sound /etc/init.d/sound
update-rc.d sound defaults
# config file
/bin/cp config.txt webcam.conf
# for WiFi
cp wpa_supplicant.conf /etc/wpa_supplicant/wpa_supplicant.conf
- crontab
# /etc/crontab: system-wide crontab
# Unlike any other crontab you don't have to run the `crontab'
# command to install the new version when you edit this file
# and files in /etc/cron.d. These files also have username fields,
# that none of the other crontabs do.

SHELL=/bin/sh
PATH=/usr/local/sbin:/usr/local/bin:/sbin:/bin:/usr/sbin:/usr/bin

# m h dom mon dow user	command
17 *	* * *	root    cd / && run-parts --report /etc/cron.hourly
25 6	* * *	root	test -x /usr/sbin/anacron || ( cd / && run-parts --report /etc/cron.daily )
47 6	* * 7	root	test -x /usr/sbin/anacron || ( cd / && run-parts --report /etc/cron.weekly )
52 6	1 * *	root	test -x /usr/sbin/anacron || ( cd / && run-parts --report /etc/cron.monthly )
#
#
10 0	* * *	root	/home/pi/encode.sh > /dev/null 2>&1
0  *	* * *	root	/home/pi/clear.sh
*/5 *	* * *	root	/home/pi/stat.prl
- rc.local
#!/bin/sh -e
#
# rc.local
#
# This script is executed at the end of each multiuser runlevel.
# Make sure that the script will "exit 0" on success or any other
# value on error.
#
# In order to enable or disable this script just change the execution
# bits.
#
# By default this script does nothing.

# Print the IP address
_IP=$(hostname -I) || true
if [ "$_IP" ]; then
  printf "My IP address is %s\n" "$_IP"
fi

/etc/init.d/sound ip
/home/pi/start.py &
/home/pi/webcam.sh &
/home/pi/webcam2.sh &

exit 0
●WiFi の設定- ・/etc/wpa_supplicant/wpa_supplicant.conf の ssid と psk を編集する。
ctrl_interface=DIR=/var/run/wpa_supplicant GROUP=netdev
update_config=1

network={
    ssid="SSID"
    psk="KEY"
}
- ■後述の、QRcode でも設定できます。
●終了スイッチと、動作LED
- 必要なハード:GPIO18—[プッシュ・スイッチ]—GND
- 必要なハード:GPIO17—[R]—[⇒LED]—GND
- これにより、
- 起動〜:消灯
- 起動終了〜:点滅
- スイッチを押す:点灯
- シャットダウンほぼ終了:消灯
となり、最後に本体の緑のLEDの点滅が終了したら、電源を切って大丈夫です。
また、起動時にスイッチを押していると、設定を初期化して再起動します。
※スイッチ入力は、プルアップの設定にしています。
start.py#!/usr/bin/python
import RPi.GPIO as GPIO
import time
import os
# set I/O pins
GPIO.setmode(GPIO.BCM)
GPIO.setup(18, GPIO.IN, pull_up_down=GPIO.PUD_UP)
GPIO.setup(17, GPIO.OUT)
# LED state
state = True
GPIO.output(17, state)
if GPIO.input(18) == False:
os.system("echo raspberry > /etc/hostname")
os.system("echo pi:raspberry | /usr/sbin/chpasswd")
os.system("/etc/init.d/sound restart")
os.system("shutdown -r now")
sys.exit()
# check SW
while GPIO.input(18) == True:
time.sleep(0.2)
# blink LED
state = not(state)
GPIO.output(17, state)
# if SW pushed
GPIO.output(17, True)
os.system("shutdown -h now")
●音声出力- 起動時、終了時などに、イヤホン端子から音声で情報を知らせます。
sound#!/bin/sh
### BEGIN INIT INFO
# Provides: sound
# Required-Start:
# Required-Stop:
# Default-Start: 2 3 4 5
# Default-Stop: 0 1 6
# Short-Description: Start/Stop sound
# Description: start/Stop/Error/Restart sound.
### END INIT INFO
opt="-x /var/lib/mecab/dic/open-jtalk/naist-jdic \
-m /usr/share/hts-voice/mei/mei_normal.htsvoice \
-ow /home/pi/$$.wav"
case "$1" in
start) /usr/bin/amixer -q cset numid=3 1
/usr/bin/amixer -q set PCM 400
/usr/bin/aplay -q /home/pi/start.wav
exit 0
;;
stop) /usr/bin/aplay -q /home/pi/stop.wav
exit 0
;;
error) /usr/bin/aplay -q /home/pi/error.wav
exit 0
;;
restart)/usr/bin/aplay -q /home/pi/restart.wav
exit 0
;;
ip) hostname -I | sed 's/\./点/g; s/^/IPアドレスは、/; s/$/ です。/;' | \
open_jtalk $opt
;;
hostname)hostname | \
open_jtalk $opt
;;
df) /bin/df / | /usr/bin/tail -1 | /bin/sed 's/.* \([0-9]*\)%.*/使用量は\1パーセントです/;' | \
open_jtalk $opt
;;
cpu) /bin/grep CPU /var/www/html/stat.txt | /usr/bin/tail -1 | /bin/sed 's/.* \([0-9.]*\) .*/CPU \1度/;' | \
open_jtalk $opt
;;
temp) /bin/grep temp /var/www/html/stat.txt | /usr/bin/tail -1 | /bin/sed 's/.* \([0-9][0-9].[0-9][0-9]\).*/気温 \1度/;' | \
open_jtalk $opt
;;
hum) /bin/grep hum /var/www/html/stat.txt | /usr/bin/tail -1 | /bin/sed 's/.* \([0-9.]*\) .*/湿度 \1パーセント/;' | \
open_jtalk $opt
;;
pressure)/bin/grep pressure /var/www/html/stat.txt | /usr/bin/tail -1 | /bin/sed 's/.* \([0-9.]*\) .*/気圧 \1ヘクトパスカル/;' | \
open_jtalk $opt
;;
date) /bin/date '+%Y年%m月%d日' | \
open_jtalk $opt
;;
time) /bin/date '+%H時%M分%S秒' | \
open_jtalk $opt
;;
esac
aplay -q /home/pi/$$.wav
rm /home/pi/$$.wav
exit 0
●ウェブカメラ- 必要なハード:Raspberry pi カメラモジュール→秋月電子、→秋月電子、→秋月電子
- 赤外カメラの場合にあると便利なハード:→赤外線投光機、→昇圧電源
- オプション・ハード:USB カメラ
- 10秒ごとに写真をとって、時刻のテロップを挿入します。
webcam.sh#!/bin/sh
# capture size
size='--rotation 180 --width 1920 --height 1080 --nopreview --timeout 1000'
quality=90
point=64
offset=64,1024
# working dir
dir=/var/www/html/img
mkdir -p $dir
cd $dir
# etc.
temp=IR.jpg
# loop forever
while :
do
# read config
. /home/pi/webcam.conf
# wait for every 10 sec.
sec=`/bin/date +%S | sed s/.//`
sleep `/usr/bin/expr 10 - $sec`
# make filename
file=`/bin/date +%Y%m%d%H%M%S`
# capture
/usr/bin/raspistill $size --output ../$temp
# telop
s=`/bin/date '+%Y/%m/%d %H:%M:%S'`
/usr/bin/convert ../$temp -quality $quality -pointsize $point -fill white -stroke black -draw "text $offset '$s'" $file.$temp
# check QR-code
/home/pi/config.prl &
done
webcam2.sh#!/bin/sh
# capture size
USBsize='-r 1920x1080 --rotate 0'
USBquality=90
USBpoint=64
USBoffset=64,1024
# working dir
dir=/var/www/html/img
mkdir -p $dir
cd $dir
# etc.
temp=USB.jpg
# loop forever
while :
do
# read config
. /home/pi/webcam.conf
# wait for every 10 sec.
sec=`/bin/date +%S | sed s/.//`
sleep `/usr/bin/expr 10 - $sec`
# make filename
file=`/bin/date +%Y%m%d%H%M%S`
# capture
/usr/bin/fswebcam $USBsize --no-banner --quiet ../$temp
# telop
s=`/bin/date '+%Y/%m/%d %H:%M:%S'`
/usr/bin/convert ../$temp -quality $USBquality -pointsize $USBpoint -fill white -stroke black -draw "text $USBoffset '$s'" $file.$temp
done
●タイムラプス- 毎深夜、ウェブカメラで撮影した1日分の画像が5分弱のビデオになります。
encode.sh#!/bin/sh
# default
encode='-r 30 -f image2 -i'
USBencode='-r 30 -f image2 -i'
. /home/pi/webcam.conf
# working dir
dir=/var/www/html/img
cd $dir
# set last day
dir=`/bin/date -u +%Y/%m`
/bin/mkdir -p ../video/$dir
d=`/bin/date -u +%Y%m%d`
# encode
ls $d*.IR.jpg | awk 'BEGIN{ n=0 }{ printf "mv %s IR%04d.jpg\n", $0, n++ }' | /bin/sh
avconv $encode IR%04d.jpg ../video/$dir/$d.IR.mp4
# remove JPG file
/bin/rm -f IR*.jpg
rm ../IR.mp4
ln -s /var/www/html/video/$dir/$d.IR.mp4 /var/www/html/IR.mp4
# encode
ls $d*.USB.jpg | awk 'BEGIN{ n=0 }{ printf "mv %s USB%04d.jpg\n", $0, n++ }' | /bin/sh
avconv $USBencode USB%04d.jpg ../video/$dir/$d.USB.mp4
# remove JPG file
/bin/rm -f USB*.jpg
rm ../USB.mp4
ln -s /var/www/html/video/$dir/$d.USB.mp4 /var/www/html/USB.mp4
●画像を見るには?- 外部から http://[raspberry pi の IP アドレス]/cgi-bin/log で、画像やビデオを見ることができます。
log#!/bin/sh
echo Content-type: text/html; charset=utf-8;
echo
echo '<!DOCTYPE HTML PUBLIC "-//W3C//DTD HTML 4.01 Transitional//EN">'
echo '<html lang="ja">'
echo '<head><meta http-equiv="Content-Type" content="text/html; charset=utf-8"><title>Webcam</title></head><body bgcolor=black text=white><pre>'
/bin/cat /var/www/html/stat.txt
echo '</pre><a href="/"><img border=0 src="/stat2.png"><img border=0 src="/stat.png"><img border=0 src="/scale.png"></a>'
cd /var/www/html/img
d=`/bin/date +%Y%m%d`
for name in IR USB
do
echo '<hr/>'
for i in 00 01 02 03 04 05 06 07 08 09 10 11 12 13 14 15 16 17 18 19 20 21 22 23
do
f=`/bin/ls $d$i*.$name.jpg 2>/dev/null | /usr/bin/head -1`
if [ ! -z $f ]
then
echo -n '<a href="/img/'
echo -n $f
echo -n '"><img border=0 width=320 src="/img/'
echo -n $f
echo '"></a>'
fi
done
if [ -f ../$name.jpg ]
then
echo '<br/><br/><a href="/"><img border=0 width=640 src="/'$name'.jpg"></a>'
fi
done
echo '</body></html>'
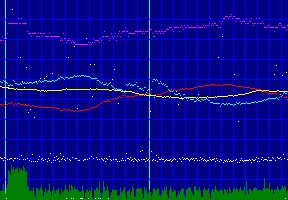
●気温・湿度・気圧などを計測して、グラフ化- 必要なハード:BME280 気圧・温度・湿度センサ →秋月電子
- BME280 のジャンパ J1,J2,J3 は、すべてショート
- BME280 1 -- Vdd +3.3V
- BME280 2 -- GND
- BME280 3 NC
- BME280 4 -- GPIO02(I2C data)
- BME280 5 -- GND
- BME280 6 -- GPIO03(I2C clock)
stat.prl#!/usr/bin/perl
chdir '/var/www/html';
$f = 'stat.png';
$f2 = 'stat2.png';
open(OUT, '>stat.txt');
# get ping host
if(open(ENV, '/home/pi/webcam.conf')) {
@_ = grep(/^ping=/, <ENV>);
close(ENV);
unless($#_ < 0) {
$_[0] =~ /^ping=/;
chop($h = $');
}
}
# init png
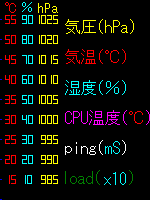
@c = qw/blue red magenta green cyan yellow white navy/;
$cmd = '-size 288x200 xc:gray';
for(0 .. $#c) {
$cmd .= " -fill $c[$_] -draw \"point 287,$_\"";
}
# is there file?
if(! -f $f) {
`convert $cmd $f`;
}
# is there file?
if(! -f $f2) {
`convert $cmd $f2`;
}
# color of time
@_ = localtime;
print OUT sprintf('%04d/%02d/%02d', $_[5]+1900, $_[4]+1, $_[3]);
$x = 'navy';
if($_[1] == 0) {
$x = 'blue';
if($_[2] % 12 == 0){
$x = 'cyan';
}
`convert +append $f2 $f png:- | convert -chop 1x0 png:- png:- | convert -crop 288x200+0+0 png:- $f2`;
}
# draw
$cmd = "/usr/bin/convert $f -chop 1x0 -background $x -extent 288x200 ";
$cmd .= '-fill blue -draw "point 287,199 point 287,179 point 287,159 point 287,139 point 287,119 point 287,99 point 287,79 point 287,59 point 287,39 point 287,19" ';
# load 0 - 10
$_ = `/usr/bin/uptime`;
print OUT;
/: (....),/;
$l = 199 - $1 * 20;
$cmd .= "-fill green -draw \"line 287,$l 287,199\" ";
# ping 0 - 100 mS
if($h) {
$_ = `/bin/ping -q -c 1 $h | /usr/bin/tail -1`;
m!= ([^/]*)!;
print OUT "ping to $h: $1 mS\n";
$q = 199 - $1 * 2;
$cmd .= "-fill white -draw \"point 287,$q\" ";
}
# CPU temp 10 - 60
$_ = `/bin/cat /sys/class/thermal/thermal_zone0/temp`;
print OUT sprintf("CPU: %.3f ℃\n", $_ / 1000);
$c = 239 - $_ / 250;
$cmd .= "-fill magenta -draw \"point 287,$c\" ";
# BME280
@_ = `/usr/bin/python /home/pi/bme280_sample.py`;
print OUT @_;
$_[0] =~ /temp : (.....)/; # 10 - 60
$t = 239 - $1 * 4;
$_[1] =~ /pressure : (.......)/; # 980 - 1030
$p = 199 - ($1 - 980) * 4;
$_[2] =~ /hum : (.....)/; # 0 - 100
$h = 199 - $1 * 2;
$cmd .= "-fill red -draw \"point 287,$t\" ";
$cmd .= "-fill yellow -draw \"point 287,$p\" ";
$cmd .= "-fill cyan -draw \"point 287,$h\" ";
`$cmd $f`;
print OUT `/bin/df -h /`;
close(OUT);
表示例 
●古いファイルの消去- ディスクの使用量が80%以上になると、古いファイルから消していきます。
clear.sh#!/bin/sh
f=`/bin/df /dev/root | /usr/bin/tail -1 | /bin/sed 's/%.*//; s/.* //;'`
if [ $f -lt 80 ]
then
exit
fi
d=`date '+%Y/%m/%d %X'`
f=`find /var/www/html/video -type f -printf '%A@ %p\n' | sort -nr | tail -1 | sed 's/.* //;'`
find /var/www/html/img -type f -not -newer $f -delete
find /var/www/html/video -type f -not -newer $f -delete
rm $f
find /var/www/html/video -type d -empty -delete
●設定- カメラに QRcode を見せることにより、各種設定ができます。
config.prl#!/usr/bin/perl
@in = `/home/pi/qrcode.py`;
exit if($#in < 0);
# 1st. line = hostname:user:passwd
($_ = shift(@in)) =~ s/[\r\n]//g;
@_ = split(/:/);
chop($hostname = `hostname`);
exit unless($_[0] eq $hostname);
exit unless($_[1] eq 'pi');
@passwd = getpwnam('pi');
exit unless(crypt($_[2], $passwd[1]) eq $passwd[1]);
@cmd = qw/ip df cpu temp hum pressure date time/;
@var = qw/ping size quality point offset encode USBsize USBquality USBpoint USBoffset USBencode/;
@net = qw/ssid psk/;
# command
for(@in) {
s/^[ \t]+//;
s/[ \t]+$//;
s/[\r\n]//g;
next if(/^#/);
if(/^([^=]+)=/) {
($n, $v) = ($1, $');
} else {
($n, $v) = ($_, '');
}
if($n eq 'hostname') {
if($v) {
`hostname $v` if($v);
`echo $v > /etc/hostname`;
}
`/etc/init.d/sound hostname`;
} elsif($n eq 'password') {
`echo pi:$v | /usr/bin/chpasswd` if($v);
} elsif($n eq 'reboot') {
`shutdown -r now`;
} elsif($n eq 'shutdown') {
`shutdown -h now`;
} elsif($n eq 'update') {
`apt-get update`;
`apt-get upgrade -y`;
} elsif($n eq 'clear') {
`/bin/rm -Rf /var/www/html/stat.* /var/www/html/img/* /var/www/html/video`;
`/bin/cp /home/pi/config.txt /home/pi/webcam.conf`;
} elsif(grep($n, @cmd)) {
`/etc/init.d/sound $n`;
} elsif(grep($n, @net)) {
&sed($n, $v, '/etc/wpa_supplicant/wpa_supplicant.conf');
} elsif(grep($n, @var)) {
&sed($n, $v, '/home/pi/webcam.conf');
}
}
sub sed {
open(IN, $_[2]) or return;
open(OUT, ">/home/pi/$$") or return;
while(<IN>) {
s/(\s*$_[0]\s*=).*/$1$_[1]/;
print OUT;
}
close(IN);
close(OUT);
rename "/home/pi/$$", $_[2];
}
qrcode.py#!/usr/bin/python
import os
from qrtools import QR
myCode = QR(filename=u"//var/www/html/IR.jpg")
if myCode.decode():
print myCode.data
os.system("find /tmp -type d -name 'qr*' -empty -delete")
 |
 |
 |
 |
 |
 |
| ip | clear | reboot | shutdown | status | date
time |
|---|
●専用?ケースの型紙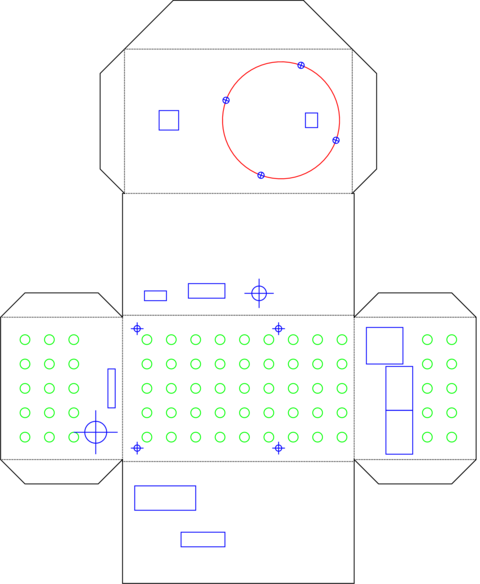
- 展開図の6面のうち、下はセンサー用の穴をあけます。
- 2段目は、Raspberry Pi2 を取り付けるネジ穴をあけます。緑の丸は、放熱用の穴です。
- 3段目は、必要に応じて、コネクタの穴をあけます。左から、USB、HDMI、Audioです。
- 4段目の左の穴はカメラ用。右の赤い円は赤外線投光器の絵で、小さい丸穴が取付用のねじ穴、四角いのがコネクタの穴です。
- 左が、完成時の底面になります。スリットはメモリカードの穴、大きな丸は電源コネクタ、緑の丸は放熱用です。
- 右が上になります。正方形はイーサネットのコネクタ。ふたつあるのはUSB用の穴です。
- 1mm程度の厚紙に直接印刷するか、印刷したものを貼り付けてカットしてください。
- 丸穴は、ポンチで開けると、きれいにあきます。
※電源およびセンサー用の穴は、各自で作成する基板にあわせてください。